Automating deployments to production with TeamCity and Octopus Deploy
Automatic deployments to production is seen as the holy grail in development throughput, agility, control and flexibility by many. Here's how we do it using TeamCity, Octopus Deploy and a bit of our own code.
As long as there are changes, we deploy our web-frontend to production once an hour through the workday without fear. And if something important is wrong, the deployment is automatically blocked and prevented from ever reaching production.
There are some prerequisites to do this safely. These are the ones we have focused on, but they might vary between organizations.
- High test coverage and multiple security nets. A high focus on automated testing on all levels and a well split up code base allows us to run various suites of unit tests, integration tests, visual tests using Chromatic and Storybook and full end-to-end tests as needed, depending on what has changed. In total, tens of thousands of tests are run several times every day.
- A notion of what is critical functionality, so we can run a smaller end-to-end test suite before every single deploy. We use Cypress, but there are probably others that'd work too. We simply decided we do not need to test everything end-to-end before each release. The rest can be tested more asynchronously to the release pipeline. This, however, must be up to you. The important bit is that it is automated.
- The whole deployment process was, before automatically pushing to production, just clicking a button. Zero human interaction except hitting that button.
- Having a dedicated, controlled test environment to use for this. This might not be necessary everywhere, but we have a lot of time-sensitive test data, so we need to be able to control what the environment looks like before the tests are run. Also fully automated.
So, how?
In short, this is what we do. I'll go into detail on each step below.
- Build and package the release.
- Deploy the release to the environment we want to test in, and prevent further promotion of the release in Octopus Deploy.
- Run the tests. If they fail, leave the release locked and post a message to Slack.
- On success, remove the release block and deploy to production.
To orchestrate this, we've built a small program we trigger from TeamCity which deals with steps 2-4. We wrote ours in C#, and it uses the Octopus.Client library which makes it easier to interact with Octopus Deploy. If this doesn't float your boat, Octopus Deploy has other offerings or allows you to go directly to the REST-API from your platform of choice. This is what it looks like in the TeamCity project list for us.

1. Build the release
Build a single package that can be deployed into any environment. This ensures that it is the same code that is tested and pushed to production. For us, this builds, runs some tests and packages the application and sends it to Octopus Deploy as a NuGet package, causing a new release to be created there in the corresponding project.
2. Deploy the release for testing
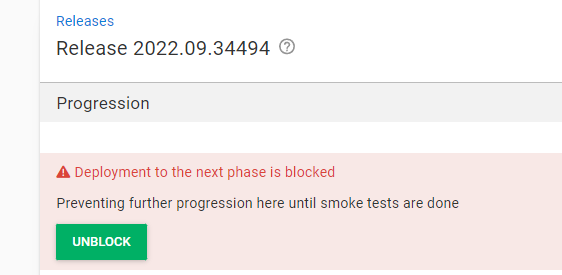
Corresponds to the CI1-step in the picture above. This step looks up the currently newest release in our OctopusDeploy project and deploys it into our "Test3" environment. It then raises a defect with a suitable message on that release through the Octopus client, so it cannot be deployed to production before it is unlocked.
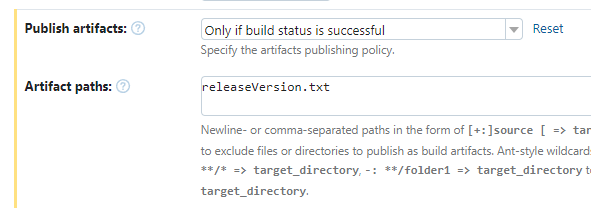
It also writes the current release-version to a text file called releaseVersion.txt on the root of the repository, so TeamCity can publish it as a build artifact for the next steps to depend on, like shown below:
3. Run the tests
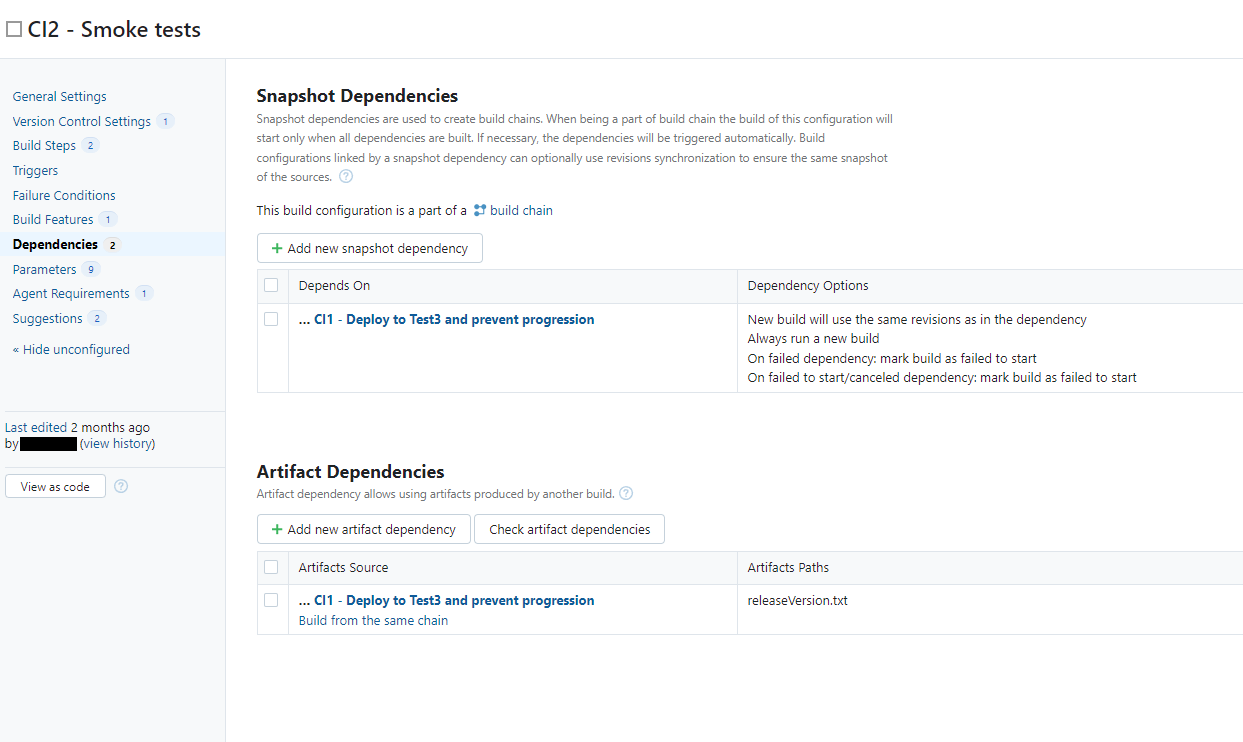
Corresponds to the CI2-step above. Runs our smoke tests - the tests we have deemed necessary to feel safe deploying to production. In our case this is around 60 full end-to-end tests, and they take around 8 minutes to complete.
This step has both a snapshot and artifact dependency on the previous step. This causes it to auto-start the step before when triggered, as well as allowing us to propagate the releaseVersion.txt file on to the next step.
In addition to this, make sure to add releaseVersion.txt on a separate line under Artifact Paths in General Settings on this build configuration. This enables the next step, CI3, to pick up this version number.
4. Remove the release block and deploy to production
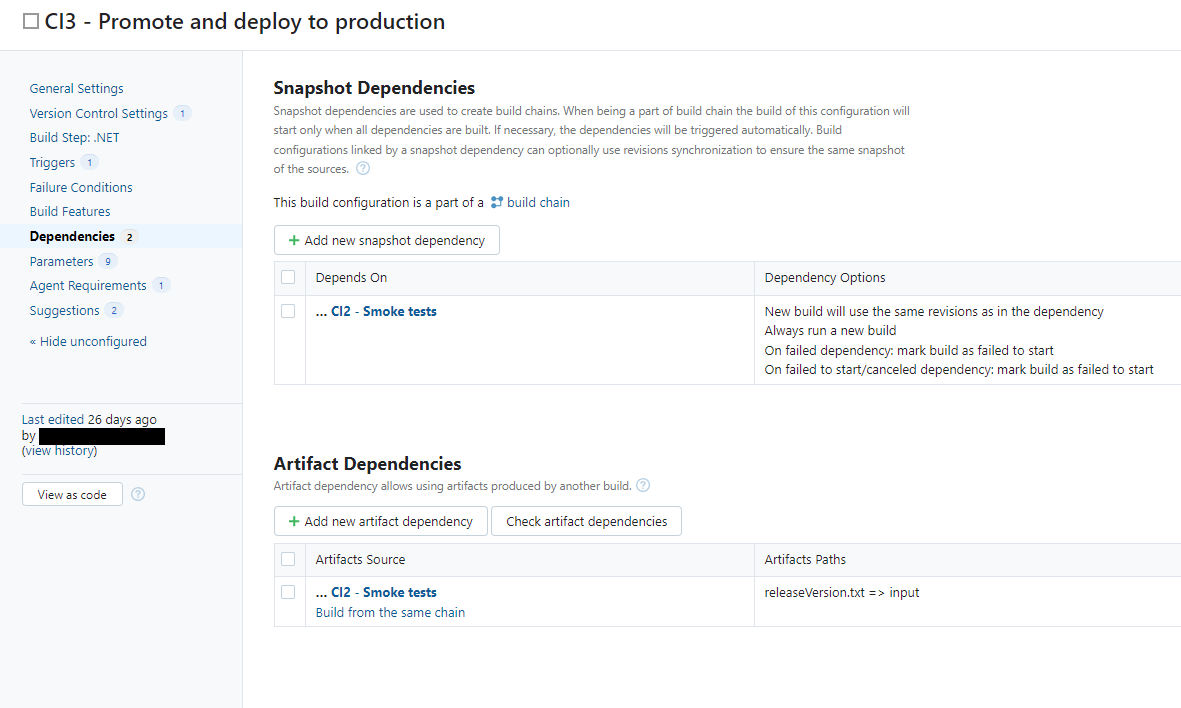
This corresponds to the CI3-step above. If any tests in the previous step failed, this step should also be marked as failed immediatley to avoid pushing a faulty release to production. This is what our Dependencies-configuration looks like:
When all the tests are green, the little orchestrator here reads the releaseVersion.txt to find what release we've just tested, removes the defect, allowing the release to progress, promotes and deploys the release to production.
This build configuration also has a scheduled trigger on it. For us, this is once an hour monday to friday, between 08:00 and 15:00. Because of the dependency chain we have set up, this is the only step that requires a trigger, as it will pull CI2 along with it, which in turn pulls CI1 along with it. If any one of them fail, the whole chain breaks down, and no faulty releases land in production.